The Cricut Explore Air 2 is an incredibly versatile cutting machine that can help you create stunning adhesive vinyl decals for all your crafting projects.
Whether you’re personalizing mugs, making wall decals, or designing custom labels, this tutorial will guide you through the basics of using the Cricut Explore Air 2 to cut adhesive vinyl decals. Let’s get started!
What Is the Cricut Explore Air 2?
The Cricut Explore Air 2 is a cutting machine designed for crafters of all levels.
It can cut various materials, including adhesive vinyl, cardstock, and iron-on vinyl, making it ideal for personal and professional projects.
This beginner-friendly machine pairs with the Cricut Design Space app, where you can create, upload, or customize designs to cut perfectly every time.
What You’ll Need
Before diving into your first project, make sure you have the following supplies ready:
Materials:
- Cricut Explore Air 2 machine.
- Cricut StandardGrip Cutting Mat (green mat).
- Adhesive Vinyl (choose your favorite colors and finishes).
- Transfer Tape (for transferring your cut designs to your project surface).
- Squeegee or Credit Card (for smoothing out bubbles).
Tools:
- Weeding Tool (to remove excess vinyl from your design).
- Computer or Tablet (to access Cricut Design Space).

Step 1: Setting Up the Cricut Explore Air 2
Unbox and Set Up the Machine:
Plug in your Cricut Explore Air 2, connect it to your computer or device via Bluetooth or USB, and follow the setup instructions provided in the box.Install Cricut Design Space:
Download Cricut’s Design Space app on your computer, tablet, or phone. Sign in or create an account, as this app will be your main tool for designing and managing cuts.

Step 2: Design Your Decal in Cricut Design Space
Create or Upload Your Design:
- Open Cricut Design Space and either upload your design file (SVG or PNG format) or create a new one using text and shapes within the app.
- Adjust the size of your design to fit your project.
Select “Adhesive Vinyl” Material:
- In the Design Space app, choose “Vinyl” as your material setting. The Cricut Explore Air 2 will adjust its blade pressure automatically based on this selection.
Step 3: Preparing the Vinyl and Mat
Cut the Vinyl to Size:
- Measure your design dimensions and trim your adhesive vinyl to fit using scissors or a cutting tool.
Place Vinyl on the Cutting Mat:
- Peel the protective backing off the StandardGrip mat and place your vinyl (color side up) on the sticky surface. Smooth it down with a squeegee or your hand to ensure it’s flat and secure.
Load the Mat into the Cricut Machine:
- Press the mat gently against the rollers and hit the flashing “Load” button on the machine.

Step 4: Cutting Your Adhesive Vinyl Decal
- Start the Cut:
- Once your mat is loaded, click the “Go” button in Cricut Design Space, then press the flashing “C” button on your machine to start cutting.
- Monitor the Progress:
- The machine will precisely cut your design. Wait until the process is complete before removing the mat.

Step 5: Weeding the Vinyl
- Remove the Excess Vinyl:
- Carefully peel away the excess vinyl surrounding your design, leaving only your decal on the backing.
- Use the Weeding Tool:
- For intricate designs, use the weeding tool to remove small pieces of vinyl from letters or detailed shapes.

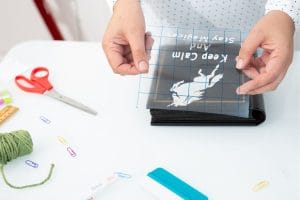
Step 6: Transferring Your Vinyl Design
Apply Transfer Tape:
- Cut a piece of transfer tape slightly larger than your design and place it over the vinyl decal. Use a squeegee or credit card to smooth it out and remove air bubbles.
Peel Off the Vinyl Backing:
- Slowly peel the vinyl backing away, ensuring your decal sticks to the transfer tape.
Apply to Your Surface:
- Position the decal on your chosen surface (e.g., a mug, notebook, or wall). Smooth it down with your squeegee to adhere the vinyl.
Remove the Transfer Tape:
- Gently peel away the transfer tape, leaving your design perfectly applied to the surface.
Pro Tips for Success
- Test Cut First: Always do a small test cut on scrap vinyl to ensure your machine settings are correct.
- Clean Your Surface: Wipe your project surface with rubbing alcohol before applying your decal to remove dust and oils for better adhesion.
- Use the Cricut Tool Set: The weeding tool and scraper make your workflow faster and easier.
Conclusion
With the Cricut Explore Air 2 and some adhesive vinyl, you can create beautiful, professional-looking decals for any project. Whether you’re a crafting enthusiast or just starting your Cricut journey, this beginner-friendly tutorial will help you get the most out of your machine.
Ready to start your crafting adventure? Check out Royal Elements’ Shop for premium-quality materials that will take your projects to the next level.