Starting your Cricut crafting journey?
Understanding how to use Cricut adhesive vinyl is essential for creating personalized projects like custom mugs, wall decals, and labels.
In this comprehensive guide, we’ll walk you through every step—from selecting the right vinyl to applying your design flawlessly.
If you’re new to Cricut, this post will set you up for success!
What Is Cricut Adhesive Vinyl?
Cricut adhesive vinyl is a versatile material designed for decorating hard, non-porous surfaces such as glass, metal, and plastic. It comes in two main types:
Permanent Vinyl: Ideal for outdoor use and items exposed to frequent handling.
Removable Vinyl: Perfect for temporary applications like wall decals or seasonal decorations.
Both types are available in various finishes, including matte, glossy, glitter, and holographic. This material opens up countless creative possibilities for your crafting projects.

Materials You’ll Need
Before you begin, gather these supplies:
Cricut Machine: Explore Air 2, Explore 3, Explore 4, Joy or Maker series.
Adhesive Vinyl: Choose your preferred color and finish.
Cutting Mat: The StandardGrip mat works well for vinyl.
Transfer Tape: Essential for transferring your design to the final surface.
Weeding Tools: To remove excess vinyl from your design.
Scraper Tool: For smoothing out bubbles during transfer.
With these materials on hand, you’ll be able to complete your project with ease.
Step-by-Step Tutorial
Set Up Your Cricut Machine
Unbox and connect your Cricut machine to your computer or device. Install Cricut Design Space and sign in or create an account.
Create or Upload Your Design
Open Cricut Design Space and start a new project. Upload your design file (SVG or PNG format) or create one using text and shapes within the app. Adjust the size of your design to fit your project.
Prepare the Vinyl and Mat
Cut your vinyl to the appropriate size and place it (color side up) onto the StandardGrip mat. Smooth it down to ensure it’s flat and secure.
Load the Mat and Select Material
Load the mat into your Cricut machine and select “Vinyl” as your material setting in Cricut Design Space.
Cut the Design
Click “Make It” and follow the on-screen prompts. Press the flashing “C” button on your Cricut machine to start cutting.
Weed the Vinyl
Once the cut is complete, remove the vinyl from the mat and use a weeding tool to remove the excess vinyl, leaving only your design.
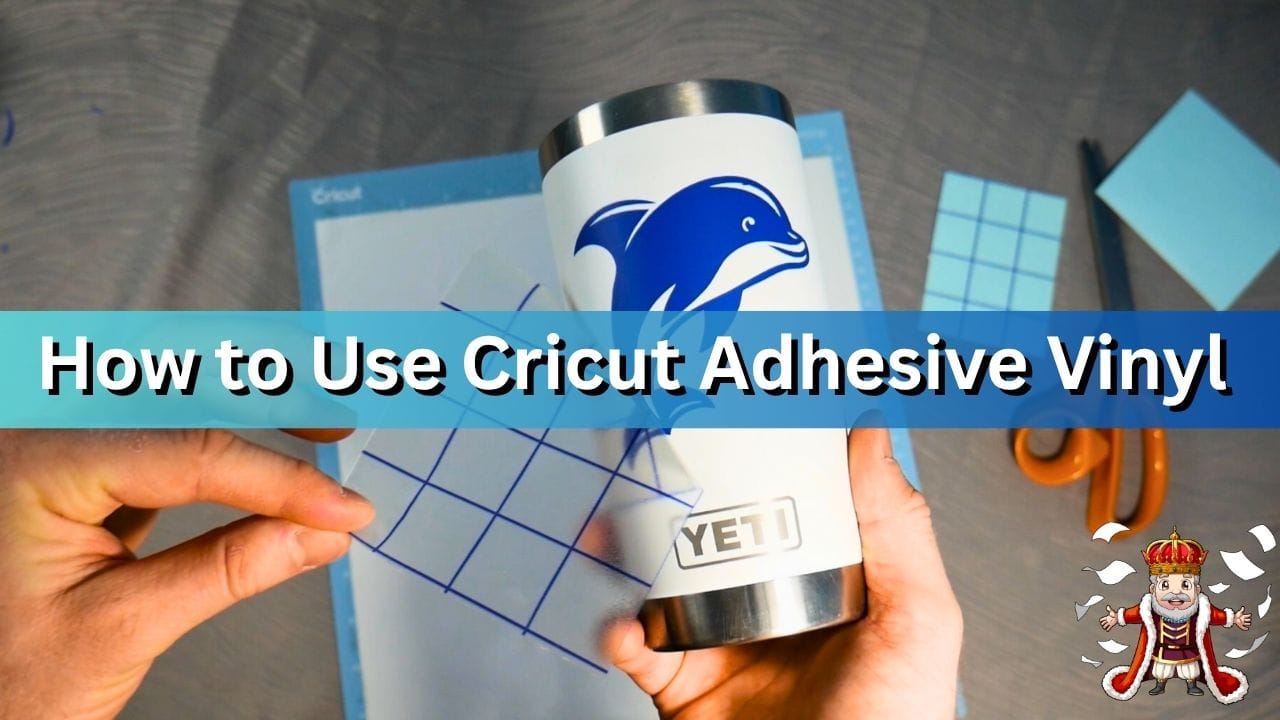
Apply Transfer Tape
Cut a piece of transfer tape slightly larger than your design, peel off the backing, and apply the transfer tape over your vinyl. Use a scraper tool to smooth out any bubbles.
Transfer the Design to Your Surface
Peel off the vinyl backing, ensuring your design sticks to the transfer tape. Position it on your chosen surface and press down firmly. Slowly peel away the transfer tape, leaving your design in place.

Pro Tips for Success
Test Cut: Always perform a test cut on scrap vinyl to ensure your machine settings are correct.
Clean Surface: Wipe your project surface with rubbing alcohol before applying your decal to remove dust and oils for better adhesion.
Use the Right Tools: Utilize the Cricut Tool Set, including the weeding tool and scraper, to make your workflow faster and easier.
Conclusion
With the right tools and techniques, using Cricut adhesive vinyl can be a fun and rewarding experience.
Whether you’re personalizing gifts or creating home decor, this material offers endless possibilities.
Visit our Shop for premium-quality materials that will take your projects to the next level.
Remember to practice and experiment to perfect your skills. Happy crafting!